Each block will be based off of a traditional block that has been modernized.
The blocks will finish at 6" square (unfinished is going to be 6-1/2"). Should your blocks be a little smaller or a little bigger, that is OK. One of joys of modern quilting, is that we don't harp on being exact.
Each month we will demonstrate the block at the guild meeting. A handout will be given at the meeting for those who wish to participate via written instructions at home.
Following the meeting, usually within a week the step outs will be posted here for everyone to follow as well.
We are asking those who choose to participate do 2 blocks each month, one that they keep and one that they are willing to swap. The swapped block will go into a basket or bag and those who participate will blind draw a block. No putting one back if its not your favorite colors!
By December we will have completed 12 different blocks and should you participate for all 10 months then you will have 24 blocks to sew into a mini quilt(s) to show off in January 2020.
In December we will post the sashing instructions, if you would like to use them. If not and you'd like to make your blocks into something more fabulous, wonderful!
So without further delay....The Basket Weave block.
This block is based off of the rail fence block. A nice easy one to do, using strips of fabrics cut to the size that we would like. For this one I have chose 3 different colors for my centers and my outer border strips a different color.
To build the basket weave, we rotate the block in different directions to give the optical illusion as seen below.
This would make an adorable quilt all on its own. In a sense, the colors could be considered modern as they are bright, you could even change one of the center strips to be a low volume or graphic print and that would also help make it a bit more modern.
But look what happens when we take the rail fence block, and let go of the "it has to be 2-1/2" wide strips and we just take a deep breath and go for it. What some call Improv.
A modern basket weave (at least my interpretation)
We still have the same concept, 3 different colors, and a border color. But my slices are wonked, I took my ruler away and just let my rotary cutter go where it wanted.
If I were to make a whole quilt out of this particular cutting, this is what it might look like
We still have the look and illusion of the basket weave. We have both a bit of Improv with our wonky cutting while maintaining the traditional concept. (Modern Traditionalism, taking a traditional block or pattern and putting a modern twist on it, in this case Improv).
I could make this even more modern by taking a random block and changing the colors entirely to stand out. Or just change the sashing (maroon) on one of the blocks to draw your eye to it. The possibilities are endless.
This will be a great way to use up scraps or just break into our stashes and have some fun.
To make our modern basket weave block -
Gather up your fabrics, as we are making this for a 6" finished block (6-1/2" unfinished), I would suggest that your fabrics be at least 3 x 8" so that you have trimming room and improv room 😀
I used left over layer cake 10" squares that I had for this particular one.
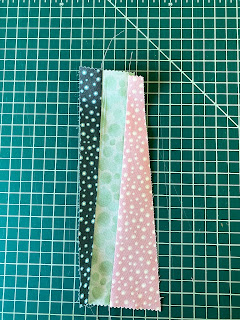
I cut my three center fabrics, not worrying that my slant was either not enough or too much and just having fun with it. I did make sure that I didn't end with points that will completely disappear when sewn together. Which is why also using a piece of fabric that is bigger than what we need gives us some wiggle room when we trim down.
We have a gentle slant to them, so off to the machine and use our 1/4" scant seam allowance. Press as you choose.
Which gives us this for our center -
Next measure the width of your center with your 6-1/2" square ruler to give you a rough idea of what you will need for your two border pieces. Again I would suggest at least 3 x 8 " for each piece, as we will be trimming this down.
With my borders sewn on, this is what my block now looks like.
You can see that my edges are not even. But that is OK, because we are now going to trim.
Place your 6-1/2" square ruler in the approximate center of the block, making sure that you have border fabric on each side. Now, if you really really really like the way that the wedges look at the top or the bottom instead, move the ruler, it is OK. Or if you really want one border to be super skinny and the other wider, that is OK, as long as you can trim down to 6-1/2" square.
I put mine on my roundabout to trim instead of moving the fabric around.
Once I trimmed and gave it a final press this is what my first basket weave block looks like
If I was going to make an entire quilt based off of this block, I would have taken each piece and used either template plastic or card stock to trace around it as a master, so that each block could be as close to the same as possible. But where's the fun in that ?!?!
Enjoy!
-Mari


